
Expert Desktop Quickbooks Tips
Customizing Reports
- Run a report.
- On the Report window, select Customize Report.
- On the Modify Report window, go to the tab/s you need to update, then select OKwhen you’re done.
The Display tab determines the information displayed on the report. There are several elements that you can change which vary depending on the report you run.
Report date range: You can select the dates the report covers. Select the Dates drop-down and choose from the available date range or manually select the date by selecting the calendar icon in the From and To fields. If you enter a To date but leave the From date blank, you get data as of the To date.
Report basis: Select either Accrual or Cash to select the report basis.
Columns: Depending on the report you’re running, you’ll have one of the following options in this section:
- Display columns by:Reports like Profit and Loss and Balance Sheet only have the Display columns by drop-down where you can select how you want the columns to appear across the top (by total, by day, by item type, etc.).Open Invoices Report and Unpaid Bills Detail Reports on the other hand, provide a list that you can use for columns. If you set up Custom fields and those fields were added to your form templates and have data, they also appear on the column list. To choose (or to remove) a column, select the data. The ones you select have a check mark.
- Sort by: A Sort bydrop-down allows you to choose how data is displayed (by Default, by Total, etc.). It determines how the report sorts within the subtotal. You can also sort by ascending or descending order.
- Add subcolumns:Some reports also provide the option to Add subcolumns.
- Advanced:Options available when you select the Advanced button vary depending on the report.For reports like General Ledger, Custom Summary, Custom Transaction Detail, Sales by Customer, Sales by Item, Sales by Rep Detail, Customer Balance Detail, Vendor Balance Detail, etc., the choices are:
- Include: Tells QuickBooks which of the accounts, items, names, etc. will be included in the report.
- All: all list and account elements
- In Use: only the elements and accounts that have activity in the period selected.
- Open Balance/Aging: Tells QuickBooks the effective date of the report and displays a transaction’s open balance as of the effective date.
- Current: show open balances as of Today, regardless of the date range of the report.
- Report Date: show open balances based on the date range selected for the report.
- Include: Tells QuickBooks which of the accounts, items, names, etc. will be included in the report.
For Profit and Loss, Balance Sheet Standard, Statement of Cash Flows and Customer and Vendor Balance Summary reports, you have Display Rows and Display Columns that tell QuickBooks which rows and columns to include in the report.
- Display rows/Display columns
- Active: include all rows or columns that have activity in the selected date range, regardless of the balance.
- All: all available rows and columns. Choosing Alloverrides the filters.
- Non-Zero: include only the rows and columns that have a non-zero balance.
- Reporting calendar: Choosing Calendar Yeardisplays balance from January to December. The Fiscal or Income Tax Year depends on what you set in your company information.
Filters allow you to limit report data to selected criteria. This is particularly important if you need to personalize the report for your needs or to isolate possible cause of an issue during troubleshooting.
To filter a report:
- On the Filter list, select the filter you want to use.
- On the Filter detail information, choose or enter additional information that QuickBooks needs so the filter works correctly.
- (Optional) From the current filter choices column, highlight a filter that you want to remove, then choose Remove Selected Filter.
- Select OK.
|
Note · QuickBooks displays a brief description of a selected filter. To know more about the filter, select the Tell me more… button. · If you’re seeing 2 classes on filters when you customize a report, select the Class that is connected to All classes. |
This tab allows you to modify the information that appears at the top and bottom part of the report.
The header information is the content that appears above the report data. The footer is the content that appears below the report data. Footer content is only seen in a print preview or on a printed copy of the report.
Check or uncheck the box for the information that you want to add/remove. Use the field provided to update the information.
To change the alignment, choose from the Alignment drop-down.
On this tab, you can change the style and appearance of a report. Areas of the report can be modified by changing the font, font size, and font style.
To modify the font:
- From theChange Font For column, select the area you want to change.
- Select Change Font….
- On the Column Labels window, change the Font, Font Style, Size, Effect and Color for the font.
- Select OK.
- Select Yeswhen prompted to apply the changes you made to all labels.
Titles are 57 characters or less. You can add subtitle characters, but the date range is no longer displayed. If a report has a customized title, go to the Help menu and select QuickBooks Desktop Help to see information about the base report from which it was developed.
Entering Batch Transactions
To get started, follow these steps in the order shown.
- From the Accountant menu, select Batch Enter Transactions.
- From Transaction Type drop-down, choose the transaction you need to enter. In all supported versions of QuickBooks, you have the option to enter multiple Checks, Deposits, Credit card charges or credits, Invoices, Credit memos, Bills and Bill credits
- Select the appropriate bank/credit card or AR/AP account from the drop down arrow. You can also choose Add New to set up the account.
- Open the spreadsheet containing the transactions to paste into QuickBooks.
- Arrange the columns in your spreadsheet to match the column order in the QuickBooks Batch Enter Transactions screen.
- Highlight the transactional information, right-click it and select Copy.
- In the Batch Enter Transactions screen in QuickBooks, right-click the first date field in the list and select Paste.
- The information from the spreadsheet displays in the Batch Enter Transactions screen.
- Continue adding all transactions.
- Select Save Transactions then Yes to save.
- A window displays the number of transactions saved. Select OK to finish the import.
You cannot export batch transactions but you can copy multiple transactions from one company file to another in a form that can be imported using the enter batch transactions feature.
Memorized Reports
Create a memorized report
- From the reports window, select Memorize.
- On the Memorize Report window, type in the name you want to assign the report. Note that you need to enter a new name when you are saving a new memorized report. If you want to overwrite a previously saved report, use a name similar to it.
- (Optional) Put a check mark on the Save in Memorized Report Groupbox if you want to save the report on a specific report group (Accountant, Banking, etc…)
- (Optional) Put a check mark on the Share this report template with others. When you check this box, your report template will be accessible to other QuickBooks users when they go to the Contributedtab in the Report Center.
- Select OK.
Access a memorized report
There are several ways to access and open memorized reports.
From the Report Center:
- Go to the Reports menu and select Report Center.
- On the Report Center window, select the Memorized
- On the left panel, choose the appropriate group. If you didn’t assign a report group when you memorized the report, choose Uncategorized.
- Double click the report to open it.
From the Memorized Report List:
- Go to the Reportsmenu and select Memorized Reports then Memorized Report List.
- On the Memorized Report List window, double click the report.
From the Reports menu:
- Go to the Reportsmenu and select Memorized Reports.
- Select the report.
Linking Bank and Credit Card Accounts to QuickBooks Desktop
- From the QuickBooks Banking menu, select Bank Feeds> Set Up Bank Feeds for an Account.Note: Check if your bank supports Online Banking in QuickBooks. Go to Banking > Bank Feeds > Participating Financial Institutions.
- In the Enter your Bank’s name field, enter the name of your bank. Note:as you type, QuickBooks displays possible matches.
-
- Direct Connect: To set up account for Direct Connect, you must first apply for online services through your bank. If you use more than one account you may have to apply for each one separately. The bank will provide you with your login credentials once your application is approved. Contact your Financial Institution (FI) for details. If your bank offers Direct Connect service, you will be redirected to a window providing you the option to enroll in the service.
- If you want to enroll, select the enrollment site link and you will be redirected to the bank’s website. Note: banks charge for Direct Connect service.
- If you do not want to enroll, you will be given the option to manually import transactions.
- If you have previously enrolled in Direct Connect, select the Continue In the next window, you can enter your Direct Connect login credentials.
- Enter your Online Banking ID and Password.
- Select Connect. QuickBooks will connect to the bank’s server.
- Select the bank account you want to connect to QuickBooks.
- Select Finish after the process completes. You have successfully activated online banking.
- Web Connect: If your bank only offers Web Connect, you will be redirected to a window providing steps to download transactions through Web Connect. Note:downloading transactions from the bank’s website and importing them into QuickBooks Desktop for the first time automatically sets up an account for online banking. Depending on your bank and the version of QuickBooks you’re using, you may be presented with options for Direct Connect, Web Connect or both.
- Direct Connect: To set up account for Direct Connect, you must first apply for online services through your bank. If you use more than one account you may have to apply for each one separately. The bank will provide you with your login credentials once your application is approved. Contact your Financial Institution (FI) for details. If your bank offers Direct Connect service, you will be redirected to a window providing you the option to enroll in the service.
- On the Link your Accounts screen, choose which bank account(s) to add to QuickBooks.
- If you have multiple accounts (Savings, Checking, or Credit Card) available to connect to QuickBooks but only need one (Checking), then you can set up online banking just for it.
- If the account is not yet in QuickBooks, select the Select existing or Create newdrop-down, then choose Create New Account.
https://quickbooks.intuit.com/learn-support/en-us/bank-feeds/set-up-account-for-bank-feeds/00/203712
Processing Credit Card Payments to QuickBooks Desktop
QuickBooks payments account processing is available from within QuickBooks Desktop, for supported versions linked to a properly configured payments account.
There are two ways to process a credit card in QuickBooks:
- Receive Payment: applies to QuickBooks customers when invoices are used to provide products or services.
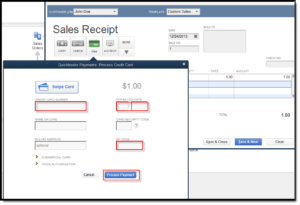
- Enter Sales Receipt: applies to sales of products or services where no invoice is used.
Record and process credit card payment
Follow these steps to complete a transaction using the Receive Payment or Enter Sales Receipt window.
Note: When using Jobs with a Receive Payment and a stored credit card number, only the credit card listed for the actual Customer will be available. Although the subordinate Job(s) will allow a different card number to be entered, it will not appear when an actual credit card charge is processed for the Customer of that Job.
- Log in to the QuickBooks Desktop Company file linked to a working payments account.
- From the Customers menu, select Receive Payments (or Create Sales Receipts).
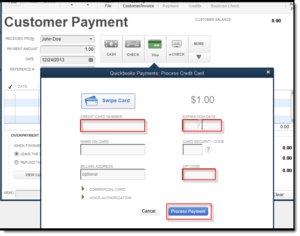
- When the payment window appears (Customer Payment or Sales Receipt), complete the customer/order information as expected. However, be careful to accurately submit the following items for proper credit card processing (if a supported USB card reader is attached, select the Swipe Card button in either of these windows):
- Payment Method (Visa, MasterCard, American Express, Discover)
Note:Process Payment box must be checked when saving. - Card Number/Expiration Date
- Amount of transaction
- Payment Method (Visa, MasterCard, American Express, Discover)
- When finished, select the Process Payment
Note: For Customer Payments that do not have an open invoice, a pop-up warning will appear notifying you of an overpayment. Choose OK to continue and a credit in the amount processed will appear for that customer when completed. - Select Save & Close to complete the process.
Determine where the received payments are posted to
To check where the received payments are being posted to:
- From the top left of QuickBooks, select Edit and choose Preferences.
- On the Preferences window, select Payments and choose the Company Preferences tab
- Check if Use Undeposited Funds as a default deposit to account is checked or not.If it is, the payments are going to the Undeposited Funds account. If it isn’t, the payments are automatically being posted to the bank account.
Note: Since approved funds are typically deposited into your existing bank account within 2 to 3 business days, we recommend using Undeposited Funds to hold payments, until they’re ready to be deposited. To know more about Undeposited Funds, check out Understand how the undeposited funds account works.
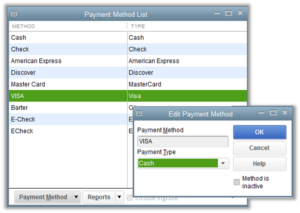
Important:
If Merchant Services is already deactivated in the Company file, please ensure you uncheck the Process Payment box so you are not prompted to connect to Merchant Services.
As another workaround, you can try changing the Credit Card payment method to CASH in the Payment Method List. This will gray out the Process Payment box and prevent it from from being selected.